
The St. Amour yard goat, S-2 #137, rolls along the Western Ave. line
with an important shipment for the Manufacturer's Generating Co..
I've long had a hankering for a depressed-center flat car, but needed to find a reason to have one on the layout. A few years ago, I built an equipment dock for the small power plant in St. Amour, in part as a destination for such big electrical loads, someday. It's a wee bit wee for this purpose, but hey, it's the Suffolk Northern - what isn't?

Dock: check. Next up: a car.
Roll Out the Zoloft
A while back, I got a depressed-center flat car as a gift from my friend Jim Bax, who is the honoree of the JBAX reporting marks for the James River Basin Petroleum Corp. refinery. It's a Roco model, and has been sitting on the shelf ever since, new-in-box, waiting for its coming out party. I liked that it's a 6-axle car, whereas most of the models you see are of the four-truck variety, which would be overkill in the tight confines of the SNR physical plant.
But the Roco needed some work for its debut. For starters it had truck-mounted couplers, and weighed nearly as much as a postage stamp. After some draft gear fabrication I was able to jam a couple hundred pounds of lead skeet shot into every nook and cranny, including the hollow between the deck and frame, and get it to at least stay on the rails when breathed upon.
However, as a low-boy it was riding on 26" wheelsets... and while they looked to be of great quality, having both metal wheels and metal axles, every last one of them was out of gauge. It was bad enough to derail the car on virtually every turnout, and no testing with additional weight would remedy it. Further, the wheels were fused to the axles so tightly that they were impossible to budge without collateral destruction of the wheelset.
So having a poorly tracking car, with oddball wheelsets, some of which were now destroyed, I was in a bit of a bind. I tried standard 33" InterMountains, but that left it riding way too high, and created clearance problems with the trucks too. Luckily I was able to locate a set of Kadee 28" wheels - close enough for who it's for. I still had to ream out the journals to get the Kadees to actually spin, of course, but ultimately did get the thing to track fairly reliably.
Woof. At least all that was left to do was a better brake wheel & staff, and weathering, especially to mute the dazzling, chocolate-brown plastic deck.

(And hey, look - a bonus shot of a JBAX tanker. Thanks for the well car, Jim!)
Depressed-center flat car: check. Next up: a load.
(Get the title reference yet? 😉 If you were watching TV in the 80s, you couldn't avoid it.)
The goal here was to find a transformer load big enough to justify a well-flat, but small enough to not also require a high-wide movement. That's actually a pretty narrow range, and no amount of searching would reveal one that'd fit the bill while also being an appealing model.
Walthers makes a nice kit, which I'd planned on using, but it turned out to be gargantuan. Gave that one away. Beaucoup 3DP and resin options are out there, but they all failed one of the dimensions, the era, and/or the aesthetic tests.
Enter, as always, my friend and tech man Darren Williamson (IHB). He looked around for drawings usable for 3D printing, but found equally few candidates fitting our specs. Finally he just engineered the damn thing himself, using numerous references from photos and plans, and printed it for me. With a couple of iterations and a coat of Westinghouse-y paint, this is the result.
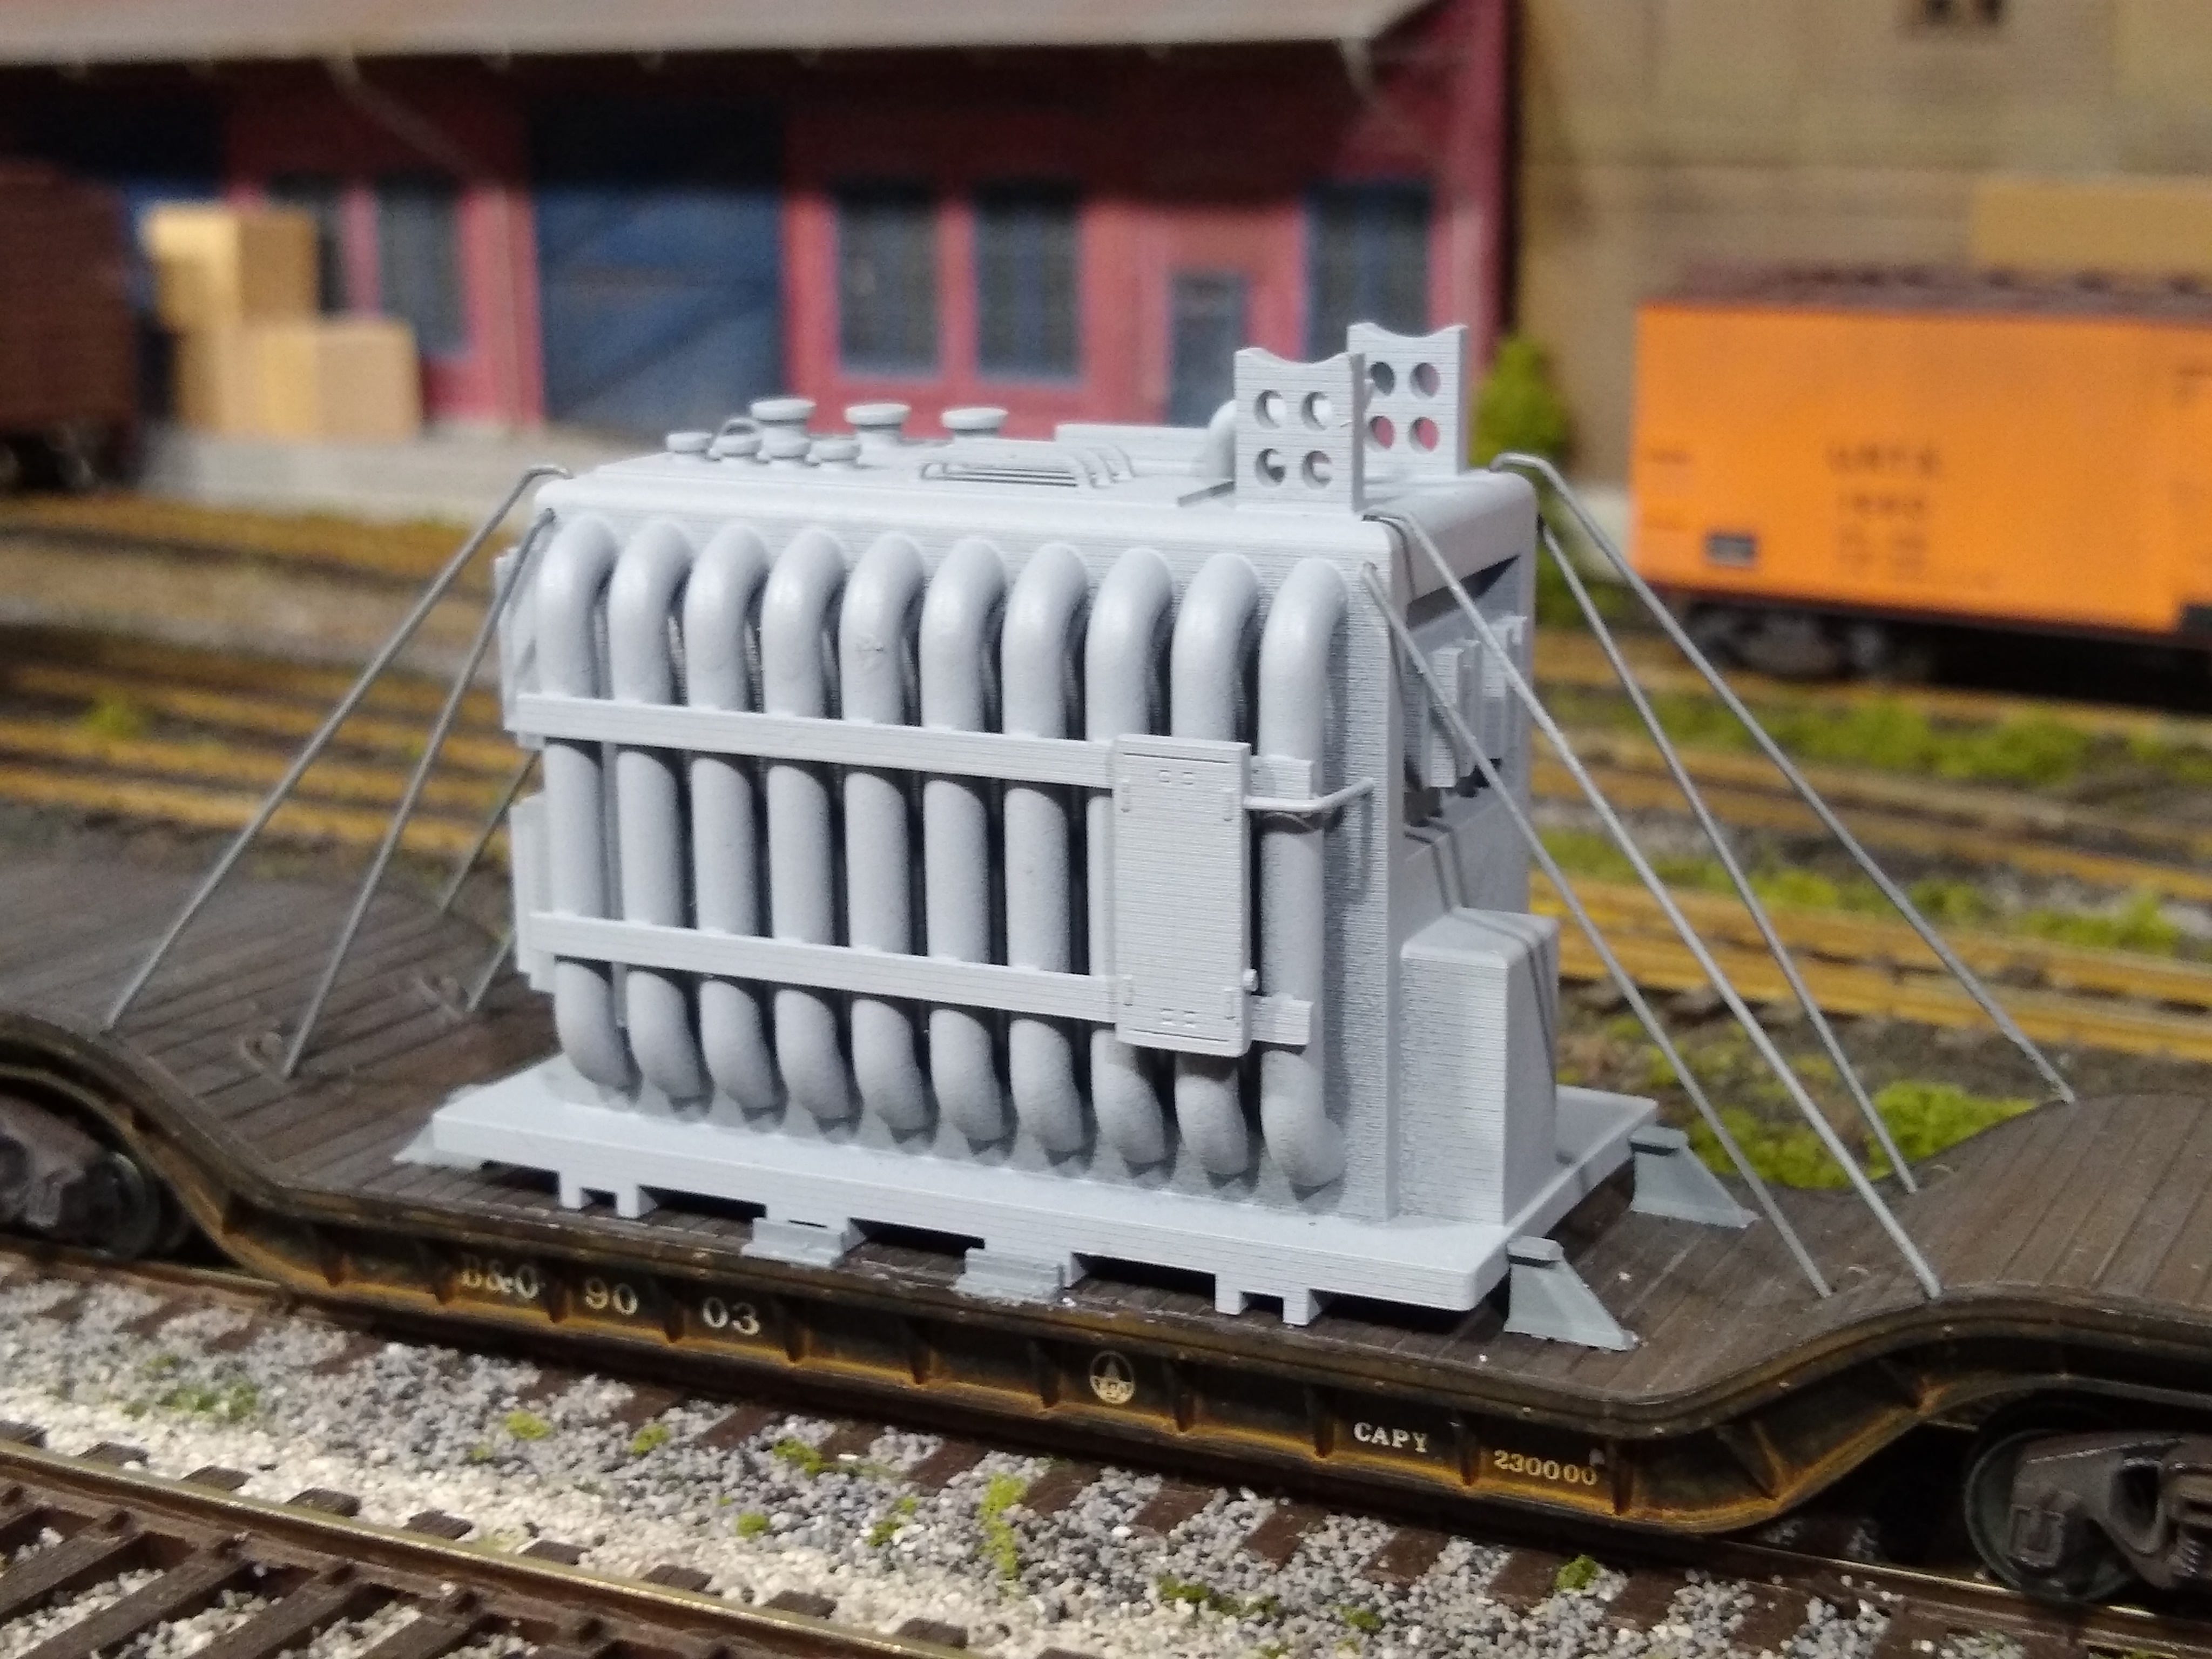
I couldn't be happier. (Thanks, D!) I think one of the best features is those cooling tubes on the sides. Modern units use cored radiators like automobiles, and, those are usually shipped dismounted from the transformer - so that the actual load is kind of just a box. But in the old days, the oil was cooled just using circulating pipes, which were integral to the unit and therefore shipped as a complete assembly, adding gobs of character.
Darren also added a variety of representative control boxes, insulator mounts, stabilizers, and other details - and those funky top brackets that are mounts for the oil reservoir. His original design included the tank too, but especially perched way up on top, that would have been shipped separately. Probably the brackets too, but no way I was parting with those!
Transformer: check. Next up: loading the thing.
Enter my friend Ed Swain, whose beautiful PRR Middle Division is replete with open-car loads. And every one of them is prototypically mounted, with chocks and blocks and straps and chains and rigs of every size. So much so, in fact, that he qualified for the billboard rotation on the SNR.

A while back Ed had turned me on to his secret muse, the book of AAR Flat Car Loading Practices, part of the Railway Prototype Cyclopedia. This is another rabbit-hole volume of addictive period minutiae, on par with the Postwar Freight Car Fleet book I mentioned in an earlier post.
Well, the flat car "bible" shows that transformers in the 25-250 ton range should be tied down using no fewer than eight 1" steel rods, secured in some way directly to the car's frame. And the unit is to be girded at its base by brackets bolted through the deck, or on steel-floor cars, actually welded to the floor. Who knew. These guys were serious.


