Welcome!

Welcome!   Use a browser to view the website's pages at right

Wednesday, December 15, 2021

Go Blue?


What, me root for Michigan in the Orange Bowl?  Hardly.  Although you do have to give them respect for the devastation wrought upon No. 2 ranked Ohio State a few weeks ago.

But no, the title question relates instead to model railroad lighting


Here's the Executive Summary:

I am experimenting with changing the lighting in the railroad room from "soft white", a warmish yellow, 
to "daylight", a cooler blue.  Want opinions!  Read on for rationale, analysis, and spiritual angst.


Cool White

In the beginning, the model Earth was without warmth, and void.  And cold gray from fluorescent tubes was upon the face of the layouts.  And God said, "Let there be warm light!"  And there was warm light.  


Soft White

CF bulbs made their debut, and suddenly it was possible to light a model railroad with a cheerier, sunnier "soft white", without roasting your crew with incandescent bulbs, not to mention annihilating your electricity budget.

I seized upon this new technology - back when I cared about new technology - and built 41 "can" spotlights, illuminating the Suffolk Northern in its new quarters with a warm yellow light, at the total draw of a scant 583 watts.  

However, it's often cloudy, misty, and dim in the Appalachians.  I painted the sky with a very pale overcast blue.  I painted the backdrop forest working from photos taken on a rainy day in the Blue Ridge - and ended up with a backdrop looking not cheery and sunny, but rather like a rainy day in the Blue Ridge.  And as described in the Trees page, I accidentally created a blue-shifted palette with the foliage, that turned out to coincide nicely with the backdrop.  All blue.

So for a while now I have been looking at that sunny yellow light falling on my blue forest and thinking it just ain't right.  The feeling has been exacerbated by the CF's tendency to both dim and green-shift as they age.  


Daylight

Enter LED bulbs.  Now not only could I cut my wattage in half again, but I had an option to go with a 5000K "daylight" color - about the same Kelvin color temperature as "cool white", actually - but in a screw-base bulb I could use with my existing spotlight cans.  I have had two of them aimed at the summit at Misty, W. Va. for a while, for contrast.  

Well after the requisite number of months of ruminating, last week I finally went ahead and ordered enough bulbs to do one of the two rooms.  I started with the west room, the much more mountainous and remote of the two.  I plan to run with the half & half plan for a while, so I can see how I like it  before making a final decision - to either "Go Blue", or roll it back to yellow.


Photo Pairs.  Ish.

Here are a few before/after shots.  Upon study you can tell some difference in the color of the trees, backdrop, and fascia, but unfortunately the point-and-shoot cell phone pics auto-correct for much of it.  It really makes an impact in person.


I would be delighted to hear opinions, on both the poor photo comparisons, as well as from ops crewmen once you've actually experienced it.  


Preliminary Findings

Here is some early analysis (with expert commentary from the worlds of music, cinema, and literature):


"How blue can you get?"
-- B.B. King, "How Blue Can You Get" (1964)

1.    The bluer color definitely eliminates the clash with the palette of the trees, backdrop, and sky.  Things blend.  


"It's a little harsh."
-- Bill Murray, Caddyshack (1980)

2.    The effect is a bit striking.  Maybe I'm just used to the aging CFs, but there's a glare on the layout that is definitely new.  


"Too damn vivid."
-- Tom Robbins, Fierce Invalids Home From Hot Climates (2001)

3.    There is a sharper contrast in the colors of the models.  Limestone ballast and concrete definitely jump out at the viewer.  Certain of the trees may as well.  I'm not sure that's either good or bad.


"And Davy Crocket rides around and says it's cool for cats."
-- Squeeze, "Cool For Cats" (1979)

4.    It "feels" cooler in the layout room.  It feels more like what you'd expect up in the mountains.  


"That's some cold-___ ____."
-- Samuel L. Jackson, Pulp Fiction (1994)

5.    As a matter of fact it actually is cooler - reducing even the CF bulbs' scant wattage puts out noticeably less heat, which some of my more penguin-oriented friends will appreciate.  The proximity to the utility room means the layout room does heat up a bit when the boiler's a-firin'.   


"I love to live so pleasantly...  Lazing on this sunny afternoon."
-- The Kinks, Sunny Afternoon (1966)

6.    There is a mood change in the room.  Before, I'd often turn on some of the layout lights when working at my desk, because the warmer yellow light was just generally happier than the cool white of the fluorescent tube work lights.  It felt less isolated and basement-y.  Whereas the bluer light has eliminated that option, yielding something that feels more like being in an office.  Which as we know, feels like work.  Wasn't expecting the touchy-feely hippie angle - we'll have to see how much of an impact that makes after a bit.  

~~~~

OK, so that's where it stands.  What do you think?  What do you light your layout with, and how do you like it?  


Thursday, November 18, 2021

Gonna Need A Bigger Boat

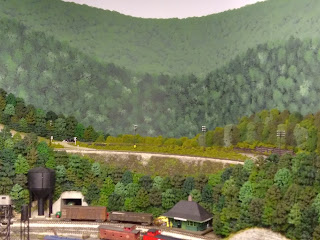
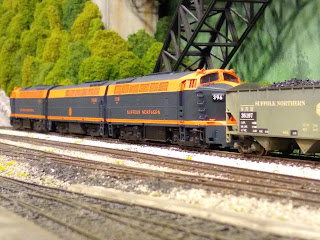
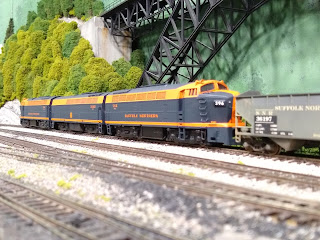
An A-B-A set of Baldwin "Sharknose" RF16s rolls through tiny Dominion, Va., with eastbound tonnage. 


SHARK ATTACK!

Finally got the painting done on my set of BLI Baldwin Sharks, and got them running on the SNR!

[ Well there's the executive summary.  Below is just a bunch of detail about paint, reliability, and backstory if you're interested.  Hey it wouldn't be the SNR blog without an excess of that.


THE MODELS

I bought them as an impulse purchase from a BLI sale email several years ago.  I've always loved these things - that pointy schnozz just makes them look like they should be bursting forth from period artwork, brimming with post-war confidence and optimism.  


Look - it's the perfect image, on a real PS cover! (OK, I added the slogan.)

I had resisted pursuing them for the SNR, because I have tried to maintain the "fleet" look by rostering multiples of things, and avoiding the one-offs.  That discipline was easy when there weren't any good models of Sharks out there.  But daggone Broadway Limited has changed that now, as they have on so many fronts - and the "sale" scent made it impossible to resist.

In 1952, the SNR is running road power in 3-unit sets, generally A-B-A for cab units, with the mid-consist engine unpowered.  So I bought two powered A-units, figuring I'd locate a dummy B-unit some other time. 

Speaking of "dummy" - it took a fair bit of fruitless searching for that unpowered B-unit before I finally determined that, lo, BLI does not offer the unpowered B-unit as a standalone item.  And, exactly why I passed on buying an A-B combo from the sale flyer in the first place - yes, it was offered - is lost to the cobwebs in my mental attic.  The conclusion?   Dummy.

So the B-unit I used is actually an old Model Power that I had lying around - a long-ago hand-off from my old friend Brian Field (Kentucky & NorthEastern).  I was pleased to discover that the proportions match very well with the BLIs - and once in matching paint and idling between the two As, its low-low-tech detailing actually doesn't stand out too much.  

Anyway, in a me-like fashion, I had let the BLIs lie around in their attractive boxes for at least a couple of years, before a looming power shortage finally got me to get them out, and get the sound tuned up to match the fleet.  I test ran them with a number of trains - then put them back into their boxes to await my interest in, and time for, painting them.

[ Another decision lost to the cobwebs in my mental attic is why the λΞЦ I ever thought I didn't want to decal stripes on engines, and that masking would be easier.  But that's the way I went, so my decal sets include only the nose swoop.  The intake and edge stripes, and the cab warbonnet, are left to masking tape, which means I generally procrastinate on painting cab units like there is no tomorrow.  Actually, more like there's nothing but tomorrows. ]

So fast-forward another couple of years, and I finally got disgusted with my procrastination and got on with it.  But at last here they are in service - and typical for BLIs, they sound maahhvelous.  Using a tip from my friend Tom Patterson (Chesapeake Wheeling & Erie), I tuned each A unit to slightly different generator pitches and notch voltages, so that their contrasting sounds would make them stand out from one another.


THE ROSTER

Now, why would there be Baldwin cabs on a predominantly EMD road, you ask?  Well, ya see like many roads, the SNR felt loyalty to one of its major steam builders, and found it just good corporate relations - as well as due diligence - to give a set of their road freight engines a whirl when they were introduced, in 1950.  So after having received 90 F3s in several batches from EMD, the railway ordered up 10 A units and 5 B units from Baldwin.  They fell right into the same freight cab number series as the EMDs, becoming #390-399, with the Bs tagged 390B-394B.

Sadly, while stout haulers, the Baldwins did not compare favorably to the EMDs in terms of reliability.  So with the next order, the railway picked up where it left off with F units, resuming the sequence at #400 and never looking back.  This left the chugging Baldwins adrift in a sea of whirring 2-stroke General Motors cab units.  


PAINT and RELATED DISSERTATIONS

You may notice that the body color is a shade or two darker than the SNR standard "Polly-S C&O Enchantment Blue".  That is because the last diesel project (RS-1 #524) turned out to be a watershed moment in my life, where I had absolutely, positively had enough of screwing with an airbrush.  I have tried for 30+ years to use an airbrush successfully, and it is simply not something I'm wired for.  If it had bolts or nails or solder terminals or screw-tops it would be fine.  But paint is a fluid, and fluids other than hydraulic are non-binary, and therefore completely confounding.  So with #524 I decided - as the blotches once again spattered onto yet another shell - that life was too short to mess any further with things I hated.  So, aerosolized paint thenceforth was just going to have to come from a can.  It's sticky, glossy, and an inch thick, but hey - how much worse can it really be than an airbrush job done with Polly-S jelly, and by me.

Two problems:  

  1. The Polly-S C&O Enchantment Blue, as we know, bears virtually no resemblance to anyone else's C&O Enchantment Blue, least of all C&O's.  And, 
  2. Polly-S is not available in a spray bomb.  

Oh wait, 

      2a. Polly-S isn't available anymore period.  

So my throwing-down of the spray-paint gauntlet left me with limited choice of colors, and none of them matched the C&O Blue already worn by 31 SNR locomotives.  (I sure showed them!)  I did try several non-railroad colors though, and happened upon Model Master Dark Sea Blue as a pretty decent match in hue to the Polly-S C&O Blue - just a fairly dark shade.  Interestingly it was closer in hue to the SNR livery than Scalecoat II C&O Enchantment Blue was, which itself does a fair job of imitating C&O's original.  Regardless, though, since paint starts fading on the prototype the moment it leaves the shop, I decided that "slightly darker" simply was going to be acceptable.    

The stripes are Scalecoat II Reefer Orange.  [ There - thought you could use a short paragraph. 😀 ]

I had first tried the MM Dark Sea Blue on some mail & express cars, and was pleased with ("tolerant of") the results.  Interestingly, one of the factors that helped was that these express cars were just freight cars on high-speed trucks - so I hit them with Testor's Dullcote, rather than the semi-gloss lacquer I had been using on passenger cars and locomotives.  And I was amazed to find that the matte finish tended to catch enough light to actually lighten the shade of blue.  

Another interesting discovery is that a dark gray primer also lightened the shade of the top coat, whereas a white primer darkened it.  There is some unfamiliar branch of either physics or sorcery at work there.       

As for the Dullcote, I think many of us have noticed, as we've entered the 21st century's second score, that Dullcote in a can has ceased being "dull", so much as "satin".  So I decided that with all of the above factors at work, in addition to both body colors being glossy sprays, that finishing the Sharks with Dullcote instead of semi-gloss made sense.  And they really do seem to blend in pretty well.


DECALS etc.

I had been musing for a while that those Sharks would look pretty cool with the standard SNR cab-nose stripe.  I reduced the swoops on the ends to go a little better with the Shark's more angular features, vs. an EMD's.  What I did not expect was how hard that Michael Imperioli-quality beak was going to be to apply a decal to.  Man that thing is so pointy you basically need a butterfly bandage to cover it, like when you slice the end of your thumb off with an Xacto.  Not that I know anything about that.  But anyway, 2-3 decals apiece and a fair bit of filling and straightening with brush paint, and I do think the look is pretty cool.    

I let the bodies sit for so long between testing/tuning and painting that I completely forgot that the number boards are lighted.  I painted right over them - and then decaled them too, for good measure.  The GP7s have decaled, illuminated number boards - and I could have had them with the Sharks too, but noooooo.  Not worth fussing with at this stage, however.  It might make a fun mini-project someday, to go back and clean them off, and re-decal.  We'll see - another one for the "Someday When I'm Bored" list.

The Sharks also received the minimalist weathering thus far applied to cab units, which is to grunge up the air intake screens with a little India Ink and pastels, to give them some depth.   The BLIs have nice, see-through separate screens, whereas the Model Power B-unit has the screening cast in relief into the solid shell, old-school.  The slight grunge helps to make the distinction between those two treatments - and thus, the presence of a step-child in the consist - a good deal less obvious I think.


REVENUE SERVICE and LACK THEREOF

I was discussing the Sharks' legendary unreliability in later (and not-so-later) years with my friend Bob Bartizek (Pennsylvania & Western), and he mentioned that while that was an issue, the PRR loved them for coal service.  Apparently with their low-revving prime movers (the sound cards certainly bear that part out - every throttle notch sounds like about the same RPM) they were torque monsters.  They just dug in and lugged - which was ideal for slow, heavy drags of a material that will not rot if it gets stuck behind a disabled locomotive or several.   

The Baldwin reliability question does also raise the Broadway reliability question, though.  I've found these engines, like most BLIs, are very nicely detailed, run smoothly overall, and have terrific sound and features.  I've also found that, like most BLIs, they are picky, and will hit the turf and cry foul on any number of track imperfections that the good ol' anvil engines (Stewart, Atlas/Roco, and Heritage steam) have always just bulldozed through.  

They also exhibit schizophrenic electronic behavior, despite being only a couple running hours out of the sealed box.  Already #390 has several times simply left the building, and refused to respond to any throttle or direction commands, requiring a factory reset and re-programming.  And #396 will randomly accelerate to full throttle when asked to slow down.  Luckily it's coupled to #390 which, if it isn't off on its own sit-down strike, is able to restrain #396 while its voltage slowly decays back down to the consist's setting.   My friend Ed Swain (PRR Middle Division) has already embarked on a campaign to replace all his BLI decoders with Tsunami2's, and the SNR may not be far behind - outstanding factory sound characteristics notwithstanding.  

All in all though, assuming I can keep them on a leash, I'm pleased with the bit of mid-century-modern variety, amid the hordes of EMD cab units in the SNR fleet.  


Wednesday, August 11, 2021

It's Not Easy Being Green


Included on the SNR page which answers the question "OK, What's Up With Those Trees?" is a discussion of how:

  1. I unknowingly managed to paint my backdrop to look like a rainy day in the Blue Ridge, since it happened to be raining in the Blue Ridge on the day I took the pictures, and, 
  2. In a humbling life-event of serendipity, I also unknowingly managed to select a color palette for my trees which coordinated perfectly with said backdrop, through the sheer dumb luck of random selection from available Rustoleum spray can colors at Home Depot.
And no, I'm not buying a lottery ticket, since that happenstance used up my entire karma balance in one shot. 

So far, so good - so what's the problem?  Well the problem is, that I had already completed a lot of work using Woodland Scenics Light Green ground foam (**see footnote), which, as does nature when the sun hits it, contains a lot more yellow than when seen on a rainy day in the Blue Ridge.

Here's a good example - the scrub brush on the slope of a fill above Bryan Ferry.


This garish contrast bugged me for years, but not badly enough to rip it out and start over.  (Actually, life is short enough that there really are very few things that ever need to be ripped out and started over.  That's why we have paint, pastels, and backstory to rationalize with.)   

I'd made my peace with the small detail areas - weeds generally are yellower than perennial plants, right?  But the big areas, and especially those visible in the same glance as the forest and/or the backdrop, just clashed, man.  A serious eyesore.  Both are green, but miles apart on the spectrum.  As I was working the forest westward from Three Rocks toward that fill, I got to where I couldn't stand it anymore.  Something had to be done (short of ripping it out, but I'll admit I was close).

In the aforementioned Rationalization Toolkit which contains Paint, Pastels, and Backstory, I chose Paint as the best weapon for the circumstances.  But rather than just paint all that ground foam** a bluer green, leaving it bright, crusty, and irregular - why not just use the blue pigment to adjust the green-ish color that was already there?  Yellow + blue = green, right?

So I made up a dye, from a shglorp of blue acrylic paint, and a lot of water.  I kept adding water until the mix was as thin as possible while still able to effect a color change on the ground foam**.  (In reality, I just kept trying mixes until the jar I'd selected was full, and pronounced that mix good.) 

Then all that was left was to stipple it on the ground foam**, making sure to mop it back up off the cinders and ballast.  The ground foam** being essentially a sponge, it just soaked up the dye and distributed it pretty evenly.  Although, it is important to keep the stuff at the bottom of the grade drained, as the mix is thin enough that it will eventually run down and settle into the lowest sponges. You can see that effect on the left side below.

At the halfway point, the difference is night and day:


It's a little uneven under close inspection, but hey, it's scenery.  And anyway, no one's nose should be within a couple feet of that fill!


In the overall view, the finished fill slope blends in a great deal better with the forest and backdrop, than the raw Light Green color did.  Enough at least that it no longer jumps out at me and makes my eyes hurt.


Next steps include applying the same treatment to several other large swathes of ground foam**, and, completing the forest below this fill and the rest of the scenery at Bryan Ferry.  Thanks for reading.  


Footnotes

** "Ground Foam".  How long did it take you to realize it's actually "ground FOAM", since it's foam that's ground up?  Rather than "GROUND foam", assuming it's foam that you put on the ground?  Just now?   Yeah, me too - or at least let's say 30 years.  😀  

Here's another one - how long did it take you to notice that "Arby's" is a phonetic play on "R.B."?  As in, "Roast Beef"?  That's just one of those things that occurs to you out of the blue while you're driving along, and you end up saying "oh, yeeeeeeaaaahhhh, I get it!" to the windshield.  


Thursday, June 10, 2021

Two New Loads for Field Fabricating

The F.B. Field Co. is a significant SNR customer located in St. Amour, W. Va..  They occupy a disused brewery building whose large, open fermentation room they have repurposed as an erecting floor.   The company supplies a variety of metal products to other businesses, the most noticeable of which are large fabricated assemblies, such as bridge and floor girders, roof trusses, stair sets, etc.. 


 Morning finds the Della St. switch crew pulling outbounds from the Field Co.'s loading shed.
 

The stamped and dye cut parts go out in boxcars, but the fabricated products leave on flats and in gons - often the same vessels used to deliver inbound coil and plate steel.  Visible open loads appearing to flow out of busy industries is a huge contributing factor to the realism and enjoyment of operations, IMO.

I have a number of fabricated loads which I cycle through for this purpose.  But you can't really ever have too many different loads, can you?  And frankly I'm a little tired seeing the same ones every few months.  

So before the op crew starts noticing the repetition, I decided I would get to work on some of the items in the "Flatcar Load Projects" bin.  Well, actually it's a bin, plus a bunch of additional candidates stacked on top of it, and spilling onto the adjacent shelves.  And floor.  Plus some kit box lids full of loose parts, teetering on top of those. You know how it goes.

Anyway, it's important to me to have loads be removable, so that once spotted, cars do not move between sessions -  but their contents change, just like life.  Again, all part of the realism.  So the removable loads lack some of the authenticity that the experts build into fixed loads, but it's a compromise I'm willing to live with.  I try to compensate by having them well blocked and tied down - I find that with at least that level of detail, you don't really notice at first that the restraints are not actually connected to the car.  "Good enough for operations"!


"READY-TO-RUN"

HA!  Read on.


The first is a RTR girder load from SceneMaster, which theoretically should have slipped out of its sealed blister pack and lilted happily onto a waiting flatcar.  Yeah, no.

  1. First, the angled support timbers come cast in a gray which is reminiscent of composite decking material - pretty much unlike any wood color occurring in nature.  So those needed some dry-brushing to get them to passable.  Which also meant they had to be removed and re-glued.
  2. Second, said timbers are not attached to anything!  Without some sort of foundation, they'd splay out like a fawn's legs at the first jolt.  So I seated them on cross-timbers that would collar them in place, as well as bear the weight of the girder.  I used 1/8" square stripwood, which was similar to the size of the uprights.
  3. Third, they needed tie-downs.  The package did contain some strapping material, but again in an unnatural color.  So I used fine black thread as with all the other loads, securing each to the ends of the cross-timbers as usual so that the whole assembly is removable.  I also dusted the thread with light grey pastel powder, to give more of a suggestion of steel cable, as you might expect with such a heavy load.  
  4. And oh yeah, fourth - it was too long!  The original model was about 70', and there isn't an open car on the whole SNR longer than 53'.  Idler flats would have been an interesting wrinkle (my "Load Master" hero Ed Swain [PRR Middle Division] would not hesitate to do that properly!  Nothing like trying to tiptoe a 140' long articulated conveyance through a sea of 40' cars in the Enola yard.)  Sadly, though, the SNR and especially Field Fabricating doesn't have the real estate for it.  So, I needed to chop a full panel off of each end.  Which also meant disassembling and reassembling the flange pieces, and a fresh coat of satin black.

Ultimately, though, it makes a striking load, and a worthy output from our loyal customer.


ONE MAN'S TRASH

The second is another girder load, but this one was about the exact opposite of "ready-to-run".


I was over at my friend Dan Hadley's house, operating on his Sierra Northern, and admiring the major new expansion he's working on.  It features a long bridge, which Dan made by affixing one side of a Walthers 90' through-girder bridge kit to the side of the spline roadbed.  But what should I spy in his trash can?  The other girder from that kit!  😱

I mean I admire the man's no-nonsense ability to cut through the crap, and discard that which he doesn't have a known purpose for.  But jeeze - there are a thousand uses for a long bridge girder!  😀 Fortunately Dan disagreed, and had no problem letting me walk out with my new prize.  It was actually this acquisition that got me going on these two new loads.

As its name implies, the girder was 90' long - meaning an easy chop in half made a perfect load for a 50' class gon or flat - with the added interest of there being two segments. Some primer and satin black completed the plastic work.

I rested the girders on the same 1/8" stripwood cross timbers as the other, then built some uprights and diagonals out of 5/64". Just like on the prototype, the strapping's tension properly ties it all together into a single unit, like a truss - yielding a triangular cross-section, with a wide dimension at the base.

As with the other, I dusted the tie-down thread with light grey pastel to simulate steel cable, and anchored the cables to the ends of the cross-timbers.  Also, on this load, I had the luxury of determining the placement, so I set the cross timbers (and cables) to the same spacing as the stake pockets on a flatcar.  This helps with the illusion that the timbers and cables are actually anchored to the car, and not part of a single removable piece.

Thanks Dan!


 Here #137 is rolling its newfound treasures onto the St. Amour interchange track, ready for YL-1 to carry them off into the commercial fray.  


Friday, April 30, 2021

Mainline Tie-Down for Mineshaft Gap


Yaeger-based helper #1107 creeps downgrade on the siding at Mineshaft Gap, W.Va., 
keeping the main clear for a eastbound to pass.


Despite the 3%+ ruling grade on Virginia Hill, there are several customers served off of it, including a coke oven battery, a pulpwood loader, and a modern tipple down a short sub.  So it's always been necessary to provide some method by which a local or shifter crew can hold cars against the grade on the main while switching the level spurs.  


For this purpose I've always used Tortoises mounted at right angles to the roadbed, that can raise or lower a rod to hold cars by the axle - or by any other convenient underbody feature that isn't a coupler. On the SNR these are called "tie-downs", although friends use different terms on their railroads as well, such as "track brakes" and "retainers".  

The two crews who switch this district - on YL-9/10, the "Gap Turn", and FS-41/42, the "Claymoor Shifter" - have the added fun of turning their trains via the Mineshaft Gap siding. The siding extends for most of its length up the ruling grade, to, and just over, Carter's Summit.  Two tie-downs have been in place for a while in this area - one on the siding at the lower end, and one on the main at the upper end, west of the summit.  


However, if you study the control panel schematic for a minute and imagine the entire thing being on a stiff grade, you'll see that the tie-downs in place are not enough to allow for turning a train, without making a number of extra trips the entire length of the siding. 

At the upper (west) end, crews who work the Barrett County interchange on HC-39, "Hadley Loads West", can use the tie-down on the main.  And, they can also leave cars standing on the siding, since it mostly levels out up there, between the west switch and the crest of Carter's Summit, due to the drop in roadbed height coming off of the "high iron".  

Whereas at the lower (east) end, seen in the top photo, the 3% grade is in full force, and there's nothing to hold the caboose or other cars left on the main.  Crews have made do by running the caboose all the way to the upper end to park it past the west switch, but then they have to run the consist all the way up as well to retrieve it - four extra laps total.  

I have been intending to add a tie-down on the main at the lower end for like, years, but you know about good intentions.  Finally though, staring at the layout with my first cup of coffee one morning this week, I said "(Expletive) it - I just need to get that done."  And I jumped in...


First step was to drill a hole and insert a length of brass tubing, to serve as a sleeve for the throw rod.  I located this exactly abreast of the other tie-down on the siding, as denoted by the Mantua milepost to the left.

Fortunately last time I made one of those 90-degree bracket blocks, I made a bunch of them.  So I already had a bracket lying around, as well as a spare Tortoise.  Therefore I was under the layout pulling muscles in my neck in no time.


I used this opportunity to paint the tops of the sleeves on all of the tie-downs yellow, so they'd be easier to spot without being too obnoxious - something I'd been thinking about for a while.  And thanks to Jim Rollwage's (UP-Denver Pacific) junk box, I had an additional Mantua milepost to use for the indicator on the mainline side.  


Next I added a toggle and LEDs to the Mineshaft Gap panel, as well as an additional set to the Carter's Summit panel, which is a repeater of this one, located up at the end of the alcove.  Run some cable, solder some connections, and we're in business.  You'd have to wonder why I waited so long!


Here's FS-41, the "Claymoor shifter", as the crew turns their train at Mineshaft Gap, utilizing the tie-downs on both the main and the siding.  You can just see the throw rod of the new one, holding the caboose by the last axle.  Whereas, the original tie-down over on the siding is holding the hopper cut by something further up under the last car.  You might not realize how stout the grade is, until you compare the hopper cut to the pulpwood racks - the pulpwood spur is level!  

After backing the empties onto the caboose, the crew will be ready to run east as FS-42, and can then switch the Claymoor mine as a trailing-point move.  From there it's back whence they came - to the coal marshalling yard at Cardiff, Va. with the day's loads.


Tuesday, March 30, 2021

I Done It - Another RS1


Fresh from the shop, newly-arrived RS1 #524 joins a sister, long-time Yaeger employee #533, 
working the interchange track at Della St. in St. Amour, W.Va..


Back in late 1950, or maybe it was early '51, the Yaeger Yard Senior Foreman requisitioned an additional RS1 to handle increasing local traffic loads.  As a sign of respect, and to see if he had a sense of humor, the Road Foreman of Engines sent him #463 instead, one of the railway's four BL2s - employees' least-loved engines system-wide.   

While this did help alleviate the motive power shortage in the absolute sense, somewhat, it did not fix one of the nagging problems, which was the RS1s' polishing of their wheels attempting to haul the ever-heavier St. Amour transfers up the Virginia Hill grade.  What was needed was a second engine, in consist.  And since the railway had been converting much of the RS1 fleet to MU capability, the Yaeger Yard Senior Foreman continued his campaigning for an additional engine anyway - specifically, one that would be compatible with the RS1s already on the property.  

Well in answer to the local crews' prayers at last, RS1 #524 arrived in Segway, Va. this week.  It was mated immediately with sister #533 - to handle the St. Amour runs, as well as HS-25/26, the Highlands Shifter, which works truck dumps in the district.  The unloved BL2 #463 will yet be defended as protection power - until a different hapless senior foreman at a different yard can be located. 


SO WHAT'S THE BIG DEAL

RS1 #524 is the first new diesel I've added to the roster since going to DCC in 2012.  And believe it or not, it's also the first decoder I've ever installed.

See, the Master Of All Things Technical, my old friend Darren Williamson (IHB), had lobbied me for 20 years to convert to DCC.  I had steadfastly refused, because I had gotten the DC cab-and-block working like a well-oiled machine, and I was proud of how well the layout ran with Byzantine technology.

"Madame, I am endeavoring to construct a mnemonic memory circuit 
using stone knives and bearskins."
-- Leonard Nimoy as Mr. Spock, Star Trek, "City on the Edge of Forever" (1967)  

Darren always referred to this behavior as "the clang factor" - in other words, me as the Luddite, clanging on my solid bronze boilers and exclaiming gleefully at the bell-like tones.

Anyway, as time wore on I had begun to identify some areas in need of improvement (or advancement) in the DC installation, that even I had to admit were becoming significant:

  1. More road cabs - the DC block system was wired only for 3
  2. Wireless throttles - in the SNR's compressed floor plan, the plugging and unplugging of throttles was a major buzzkill
  3. Sound
It was #3 that did it.  I was operating on Bill Doll's Forest Park Southern one time, and found myself actually disappointed to pick up a train behind one of the few non-sound engines on the layout.  I realized then how important sound had become to me.  And even better, it made me see that DCC would address all three major items in one implementation.

Despite all the evidence presented above however, being me, I still could not quite be convinced to pull the trigger - due to the prodigious cost, amount of effort, and downtime involved.  So Darren had to sweeten the deal with the agreement to do all of the conversions on my engines to DCC and sound for me.  That was like three dozen engines at least.  Call me today's Tom Sawyer, but the guy lives for this stuff.  Plus, he was starting to lose his mind over our being so far into the 21st century, yet with me still exclaiming gleefully at the bell-like tones of the solid bronze antiquity of it all.  Desperation is a powerful motivator.


Wudja look at that, it works!


DOIN' IT BY MY LONESOME

So doing up another RS1 years later, as a non-sound engine, provided the opportunity to install a decoder myself, for the first time ever.  And I didn't tell Darren what I was up to, just to prove I could do it - and because I knew that otherwise he'd lobby me to just let him do it anyway, so it would be done right.  

I used a Lenz Standard+, which was Darren's spec for non-sound engines that would be consisted with the Tsunamis.  And I'm proud (amazed, really) to say it worked perfectly right off the bench, LEDs and all. I've always felt like I can never thank Darren enough for all the work on the SNR's behalf, so it was time I pulled a little of my own weight.

I have to throw another thank-you, to Tom Patterson (Chesapeake, Wheeling & Erie) for supplying me from his stash, with the goodies I needed minute quantities of for this one lone decoder install - including Tesa tape and microscopic shrink-wrap.  


I think the lady in the blue '51 Chevy has had quite enough 
of RS1s parading back and forth across Della St..


Number 524 is another Atlas yellow-box RS1 that I bought in the early 90's, probably already used, like the rest of the fleet.  It joins three others on the layout, sisters 528, 530, and 533, which are sound engines.  All of them wear the SNR standard delivery scheme, in Polly-S "C&O Enchantment Blue" and Reefer Orange.

Amazingly, despite their differences in decoders and service histories, I was able to get the two consisted engines to play together nicely just by duplicating 533's speed table and motor settings onto 524, with only a cup of coffee's worth of tweaking.

The original three have been running continuously for nigh on 30 years without a problem, which is why I stick with the old Atlas Roco's (clang!).  However, the engine that became #524 has been sitting in the box for almost that long, and still, upon its re-emergence into the light, from the first volt is has been smooth as silk.  You can bet there are several more of these babies still on the shelf, in reserve! 


Wednesday, March 17, 2021

Coal Is Shiny


Cars full of "black diamonds" wait to be picked up from the Rollwage Bros. truck dump in Three Rocks, W.Va..


"In the beginning,
The coal was without form, and void,
And darkness was upon the face of the fleet."

A while back, after the SNR had been in operation for 15 years or so, I began to notice that the coal loads had accumulated a fair bit of dust, and were more gray than black.  

I use mostly resin loads, with some plastic ones covered with coal or more often, cinders.  All of them are removable, so empties can be loaded at the mines, and unloaded in staging or at the consumer.  So I scrubbed all of them down with Dawn and a toothbrush, and then painted them all (except the real coal ones) with Home Depot's finest one-buck flat black.

The difference was very noticeable.  All the coal was black again, and consistent - and I was deeply proud of my ingenuity and dedication.  A man of action - oh yes, that's me.

At a subsequent operating session, I was describing this to my friend Jim Rollwage (UP/Denver Pacific), who observed that I should try using gloss black, since coal is, for the most part, shiny.

Well, in the first place, since I'd just gone through that effort, flat black would be fine, thank you very much.  And in the second place, I imagined that gloss paint would make the coal loads glisten like golf balls.  I'd very carefully avoided shiny loads - especially plastic, factory loads - so that my coal loads would specifically not glisten like golf balls.

Jim is a good modeler and a wise man, and I have known him for decades.  You would think that I'd have given credence to his advice.  But no.  Remember, I'm a man of action.  Gloss black would have required re-work, and the reversal of a decision!  

So another 10-15 years have gone by now, and the loads are looking a bit gray again.  The other day, Jim and Gerry Albers (Virginian Deepwater District) were discussing ways to clean up their real-coal loads, which had also gotten dusty.  Their ingenious method was to clean the loads using Pledge furniture polish.

I tried this on some on the resin loads.  Results were underwhelming, because the relief is so deep, whereas it worked perfectly for Jim & Gerry on the real-coal loads.  However the conversation had gotten me to thinking about trying gloss black again on the resin loads.  The more I stared at them, the more the SNR's loads looked like peat moss, rather than "fire rock".  

So I did a test run.

"And Jim said, 
Let there be light!
And there was light."

Behold!  The difference, just as in Genesis, was night and day.  


With the flat black, especially with dust, the loads tended to blend in with the cars themselves.  Everything was one of the 50 shades gray, with a uniform matte finish.  Whereas, since the resin loads have a great deal of surface texture, the gloss black highlights individual facets that are spread evenly throughout the car, making the overall pile come alive, just like "black diamonds".  

"Very sparkly."
-- Dustin Hoffman as Raymond Babbitt, Rainman, 1988

The effect is distinct, but still subtle.  The secret is moderation, especially on loads with less texture - like those I'd made with cinder ground cover.  A lighter overspray did the trick and avoided the "golf ball".

I've completed the entire stock now, and am really happy with the results.

Thanks, Jim.  (Why didn't you tell me sooner? 😉)  


~~~~~


Below are a few before-and-after scenes.  The trains are unmoved in each pair of photos, and the cars and even the loads are exactly the same.  The only difference is the loads were removed and given an overspray of gloss black.  To me it makes the coal "pop", like it didn't with the flat.  Looks a lot more like pictures from the day.  Video is < 30 seconds.


Monday, March 1, 2021

K&LE Gondolas


My friend John Miller (Kanawha & Lake Erie) and I traded cars a while back.  The K&LE is set in 1976, so I did a "modern" 50' box car for him, with the 1968 SNR herald.  

In return I received a "delightfully crappy" K&LE boxcar, backdated for 1952 with that slick, old-school diamond herald. 


After a while, John asked me if I could spare any of the modern SNR heralds, and especially if I had any smaller ones, as he had in mind a number of variants he wanted to play with as SNR cars, including paint-outs.   No problem, since my old friend and Master Of All Things Technical, Darren Williamson (IHB), has hoarded most of the world's remaining supply of ALPS printers and ink.  I just needed to alter the artwork a little, and have him print a fresh sheet.

I gave this new sheet of modern SNR heralds and lettering to John, and seemingly within minutes, he had created a whole fleet of SNR cars for his layout.  Quite an honor, really.  On the right below is the car I initially did for him; all the remainder are his handiwork.  Photo by Tom Patterson.


It's interesting that John did up a bunch of SNR cars, since at the same time I had a hankering for some K&LE gons.  

One of the features of John's layout is a steel mill that literally is 40' long, representing the real Newport Steel, which was once just across the river from Cincinnati, in Newport, Ky..  So when I see "Kanawha & Lake Erie", I think steel, in the same way as when seeing "Pittsburgh & Lake Erie" or "Bessemer & Lake Erie".  Newport Steel would be an ideal customer for coke off of the SNR, and an ideal supplier for the industries in St. Amour that use coiled sheet. 

I asked John if he had any more of the older-style decals he could spare, and he gave me all that he had left - which amounted to a couple sets of roadnames in three sizes, with reporting marks, and one, count 'em, one, surviving pair of the diamond heralds.  There was a second pair of heralds, but they were from a misprint run, so had been marked out with a ballpoint pen. 

Well, I had two gons on hand that I wanted to donate to the cause.  So I determined I was going to have to use the mark-outs anyway, if they could be cleaned up adequately.  I'm not having visiting freelance equipment without heralds and roadnames!


16003

The first gon was a modern issuance of the traditional Model Die Casting/Roundhouse 40' bathtub.  It was black and decorated in the minimalist Erie scheme.  Perfect for making data-only cars by just a little painting-over, as I've done on a couple dozen hoppers.  

This however was a very old scheme, with old-school, pre-AAR-format dimensional data.  So I determined this would be the right car to use the mark-out heralds on - I could keep the all the pretty data stencils, and weather the hell out of it, since painted like that it would be seriously in need of shopping in 1952.  I could then use the heavy weathering to hide the mis-print in the heralds.

So other than the K&LE lettering, paint on the trucks and wheel faces, and a thick mantle of pastels, this one is straight out of the box and into the rotation.  SNR uses a fleet of a dozen of these bathtubs, about half home-road - to serve the coke works in Claymoor, and for other aggregate service such as limestone, gravel, and pig iron.  They are also available for occasional mill and scrap loading.


I did not initially intend to use the teeny roadname, however the intermediate size roadname would only fit two letters per panel.  On a 40' car, that meant I'd run out of panels before I ran out of roadname.  So, since there are other examples out there of gons lettered with teeny roadnames (C&O is one), I figured I'd just use the smallest size here.  It's actually a pretty neat look I think. 


16358

Now, this - this - is what I'd been picturing a K&LE gondola on the SNR looking like:  a mill gon loaded with coils from the rolling mill in Newport, headed for either Field Fabricating or the Combustioneer plant in St. Amour... with that loooooooong roadname playing hopskotch with the ribs all the way down the side.  

It happened that the other gondola I had on hand was a standard Athearn 50' mill gon.  I know, I know, these are foobies because they don't have ribs over the bolsters, and would fold up on themselves.  Yeah yeah, I still love the proportions of them, and, they run great (once you glue a couple tons of skeet shot into the belly), which is the foremost criterion on the SNR.  It'll be OK to use it - there are only a couple others on the layout.

This car was silver and decorated for the Southern, so it was going to need a full paint job and a complete set of decals.  And hooooo, boy, with that many ribs we are talking about a lot of teeny decal pieces.  Below is what happens when a decal sheet is innocently walking along and steps on a land mine:


Even so, I was pleased at how comparatively easy it was to get the decal shards lined up - especially the roadname segments - with minimal eye strain or migraine.  

This car also received a set of new stirrups, Intermountain wheelsets, metal couplers, and Tichy trucks to replace the beautiful-but-unreliable sprung trucks it had been riding on when I bought it.  


With this design I could have picked any build date from the 30s into the 50s.  I settled on 6-49, so it would have only light weathering and could best show off those boss K&LE diamond heralds.  Even in three years though, this one has managed to get a replacement wheel already.  Must have cracked from the heavy service!


These guys hit the rails a week ago, and are already active in the switchlist system.  16003 even got billed already, heading empty to Downey & Moss, for a load of coke to feed the furnaces at Newport.