Welcome!

Welcome!   Use a browser to view the website's pages at right

Sunday, January 28, 2024

Bulk Storage for Aidan Castings


I've finally gotten down to working on the scenery around the industries in Bryan Ferry.  But since it takes me forever to actually finish anything, I thought I'd show you first the major sub-project in that endeavor by itself, which is the bulk storage bins for the Aidan foundry.  

👉There's some interesting discussion around it, too - stay tuned!👈


The foundry receives coke, limestone, and pig iron in gondolas, and sand in covered hoppers.  As a small-town furnace, their operations are a bit casual - bulk materials are unloaded with an ancient conveyor, and stored on the ground, and charged into the furnace used a bucket loader.  Scrap is also a major inbound commodity, but being chunky and irregular, it can just be piled in a heap off to the side - no bin required.  

So I've been staring at that odd-shaped blank space for years, knowing what I wanted to build - a set of bins radiating out from a movable conveyor - but stewing over how to terminate it at the layout edge.  Any facility not extending beyond the layout would be ridiculously undersized, even by SNR standards - so an accommodation had to be made. 


Now, I've sliced through foreground buildings before, and I've treated the raw slice in two different ways:


1). At the J.D. Bumhauer Co. in St. Amour, I left the building open at the section, 
since the primary point was to provide a "railfan-through" scene, 
where one can watch rail traffic roll by through the numerous 
steel-sash windows, as I once did at a client in Hartford, Ct..  


2). Whereas, for the sand bin on the Yaeger service tracks, 
I built some mock-fascia to cover the exposure, 
since in real life one wouldn't want to see the inside 
of a giant pile of sand.  Or so I thought at the time.


At the foundry though, I had these odd-shaped walls in irregular alignment, with some interesting material heaps in the foundryman's four favorite flavors.  It seemed a shame to cover it all up with fascia - especially given that the wall slices go all the way to the top.  

So I opted to reverse the sand bin ruling, and leave these bins exposed at the section - as if the material were piled up against a pet's terrarium glass, to be viewed from the outside - along with the pet - by a superior species.  Well - at least a species that thinks it's superior to the pet.


The walls are foam-core, with the edges capped with putty.  All five of them actually follow the same pattern, just being abbreviated in different places based on where they strike the layout edge.

As always with concrete, I painted them with a latex mix, using horizontal brushstrokes which help suggest the casual, small-batch pours that were used in the day.  Initial weathering with washes of India ink highlighted the unevenness.  The sectioned foam-core centers make pretty decent concrete cuts, I think - maybe I should add some rebar!  


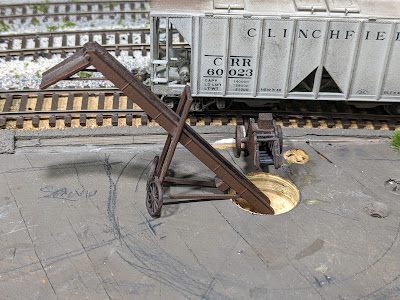
I did a quick mod on the Walthers conveyor to align the wheels circumferentially, allowing the conveyor to swing and serve any of the four commodities.  Haven't thought through what the pit is going to look like yet - would they just leave a mix of spillage at the bottom, or clean it out after each unload?  


I shaped the heaps first with foam and a hotwire, then covered them over.  The limestone is ballast, but the sand and coke were done with bona-fide sand and coke.  (For the record, all the coke and coal on the layout comes from nuggets of each I picked up as a kid, along the B&O in Tri-County.  How's that for authentic.)   Those three materials could be added after gluing the foam shapes into the bins.

For pig iron, though - in gondolas I use Chooch sugar-beet loads, which have textures that are surprisingly close in shape to the little piggies.  When painted and weathered with oxides, they're pretty convincing.  No such material exists in aggregate however.  So I approximated it with aquarium gravel, except that had to be painted after heaping and gluing, but before installing.  That was fun.  


And there it is - inbound materials at long last.  Next up, as Paul Harvey would say:  "the rest of the story."   

Eventually.


 👉  Faced with the same dilemma, 
would you cover the section with fascia, 
or show off the interesting stuff 

👉  Is it silly to see the sheer faces of aggregate heaps 


Thanks for reading, and let me know what you think!


Thursday, November 30, 2023

Hopper Traffic Flow


Mine shift job HC-39 heads across the Gloucester Fork arch bound for the marshalling yard, 
where it will send its coal loads off to market and pick up empties for the next op session.


Since no one asked, I thought it might be interesting to start a discussion on the flow of hopper cars...  I'd love to hear your philosophy and opinions - how do you handle bulk loads?  What's most important to you?


Guys who are better modelers than me (this means you!) often prioritize the beauty of the load over the flow of the hoppers, preferring cars to be permanently loaded.  I totally understand this, and I'm blessed to get to run on some gorgeous layouts that handle coal this way.  

However within my head - scary as that may sound - it's more important that the railroad seem to be going about its business on its own.   Meaning, I want to be merely a spectator and a railfan, interfering as little as possible with its traffic.  The more I have to think through and manipulate things during re-staging, the more recognizable the trains are when they emerge during ops.  And on my own layout at least, that pierces the fourth wall, and takes away some of the fun.  


HC-39 arrives at East Segway after an ops session to deliver its loads.  
The former BE-46 waits on an adjacent track to supply it and other shifters with empties.


So if the goal of ops is to try to run a layout like a real transportation system, on the SNR at least I just can't re-stage loaded cars back to the mines.  And just I can't take the loads out of shifters and send them back out with the same cars they just picked up.  It chafes, man.  For the simulation to work, I want to know that a mine's coal is going to all the way to market, and in the very empties that were delivered to its tipple to fill.  As I said, it's a scary place in my head.

Anyway...  In the era before unit trains, this tenet yields two important corollaries:
  1. Empties must be loaded at the mines between sessions.
  2. Hoppers must circulate randomly, with little identifiable repetition or pattern.


At the Permian Fuels Corp.'s Claymoor Mine, empties set out by FS-41 during the last op session 
are filled as delivered.  They'll await the return of FS-41 in the next session to pick them up.  


In implementing these rules on the SNR, the mine shifters' loads are combined to form new road trains during re-staging - and at the same time, the empties trains are broken up to supply hoppers back to the shifters.  Basically this mimics the work of a marshalling yard on the prototype, not to mention mimicking the distant consumption of coal once it's brought up and sent away.  And not having room for an actual coal yard, I still get to operate through that part of the cycle out in the light, between sessions. 


At East Segway, F-M #164 breaks up an empties-east job from the previous session, to re-supply the visiting shifters.  He'll marshal their setouts into a new loads-west road train for the next ops.


Arguments can be made that this is overkill and that no one will notice.  That is probably true, but - I will.  Plus it lets me enjoy running my own railroad even while doing behind-the-scenes work.

The flow looks something like this:


The upshot of this flow is that each hopper makes a single, complete circuit of the coal production loop, every time.  Just like life.

Since every re-stage of the layout sets up two monthly-ish op sessions, the diagram suggests it could be almost a year before any given hopper gets back to where it started.  And when it does, it's going to be in a very different mix of cars than in the previous round.  Just like back in school - you went through 12 years with the same group of people, but every class in every year was a different subset. 


With its marshalling work complete and its symbol changed, new shift job HE-38 
threads through the interlocking at SE tower and gets out of town, bound for Gallipolis staging.


This all is what the world looked like to me as a kid when I first discovered coal trains, rolling up the B&O through Springdale.  There didn't seem to be any detailed mechanics or obvious repetition at work - just loads moving west and empties moving east, continuously.  So that's always been what I wanted to see happen in my own model world.  


How about you?  Love to hear what you guys think, and what matters on your layout.  Thanks for reading!


Kanawha #1812 departs Segway for Amherst staging, with the shifters' loads 
having constituted a new TC-17, ready for the next ops.  


Footnotes:

My business partner once remarked to me, being the CPA, that "Even your checklists have checklists."  This is from the attorney who couldn't follow a recipe to save his @$$, but that's a story for over beers.  He's right, though, and just to prove it - at the risk of drowning you in minutiae (don't read it!) - here's a sample of the Coal re-staging checklist.  And yes, it itself is represented by a single line item on the Overall re-staging checklist.  


Friday, October 6, 2023

Plexiglass Alternative


I have a number of good friends who swear by Plexiglass, for protecting delicate details unavoidably located close to the front of the layout.

These guys are great operators and great modelers, and have some years - er, wisdom - on me too...  So you'd think I'd want to heed their advice.  

Thing is, though...  yeah.  I just really like to avoid things that "break the 4th wall" - interfere with the scale reality when operating - if I can help it.  I keep structures and details floating on their mounts wherever possible, and in general I'd just rather fix things, than be walled off from my gameboard.  Just my preference.

There is one significant exception, however - one that can't float, and can't easily be fixed.  It's the right crossing flasher in Three Rocks, which is at shoulder height, 1" from the fascia, and square in the path of uncoupling-related arms and elbows.  It also happens to be a Tomar mast, which is not only the best of breed IMO, it's also no longer available - and has no reasonable facsimiles out there.


Over the years, that outside mast has been blasted, bent, straightened, glued, soldered, and jumpered so many times that it not only has become permanently stooped, it's also down to one single operable lamp out of four.  Reminds me of Homer Simpson's Christmas lights.  


For the record I am certain that virtually all - if not actually, literally, all - of the destruction, was at the hand of... the owner. 😁  (Or the elbow, or forearm...)


Anyway, I was recently fortunate enough to find a used pair of Tomars on Ebay whose buy-it-now figure wasn't stratospheric multiples of the list price.  But I had to accept that this one was officially a rare bird, in danger of extinction, and was going to need to be armored in some way.  So I began musing about novel defense mechanisms...

Here's what I came up with - how about protecting the delicate stuff with buttressed versions of things that could belong in the scene anyway?  In this case, that meant telephone poles.  On the surface they are unassuming line poles - easily snapped off with a sidelong glance, you say?  Au contraire - in reality they are made of coat-hanger wire, which, when cut to short 5" lengths and anchored through the homasote into bedrock (plywood), become stout enough to fend off the errant elbow even in 1:1 scale.  


Interestingly - for all the reaching I've done in Three Rocks since installing them, I've almost never actually contacted them, much less hit the flashers.  There's something about their presence that just makes you go carefully around or between them.  Whereas, I mercilessly beat the crap out of the previous unarmored model, QED.

One weakness in the plan, though, is... what are they, actually?  There ought to be poles nearby - I mean, there's a signal line paralleling the tracks, isn't there?  (Out in the aisle)...  And there are probably utility lines crossing the tracks to serve downtown...  But since neither of those installations actually exists, it seemed OK to not affix any specific crossarms to the poles, and just let the viewer's mind figure it out.  To me they look wrong individually... but the scene looks right.

I would love to hear what you all think.  Useful?  Or clumsy-looking?  If you've done switching up at Three Rocks recently, did you notice them?  Did you ever run into them?  And for your own layout, could you envision a similar application?

Thanks for reading, and I'm looking forward to discussion. 


Saturday, August 26, 2023

"Say Yer Prayers, Varmint!"

"Git yer flea-bitten carcass off'n my real estate!" - Yosemite Sam


It's a fact of nature that when you live near the forest, you will - at least occasionally - have mice in your house.

Generally the black rat snakes out in the woods do a pretty good job at patrolling the perimeter.  But every now and again, an intruder or several will penetrate that defense, and set up shop in the basement.  Maybe the snakes are on vacation.


This round's first evidence of illicit rodent activity:  a peanut in the trees! 
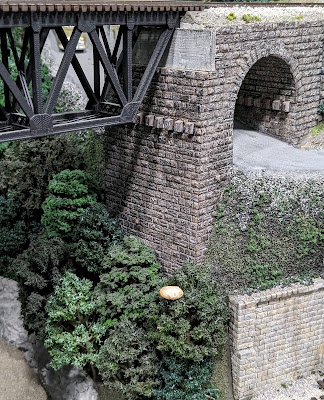
Right below the precarious deck-girder bridge at LaMont...
"What the...?!"  


Most often they (the mice) raid the stack of scrap wood outside Slim's Cooperage in Three Rocks.  Plus of course some collateral disruption - and yeah, some extra "coal lumps" along the right-of-way.

But most recently, they committed acts of larceny so novel I almost had to admire their resourcefulness, if it weren't so infuriating: 


👉  They destroyed my smoke, man.  👈  


The Basin refinery in St. Amour has a mirror behind it, which doubles its apparent size.  And the mirror has (well, had) cotton smoke plumes concealing the top edge of it.  And these little 𝄳@§+@𝅘𝅥𝅮$ actually climbed tanks and scaffolds to tear them down, strip them clean, and abscond with the cotton!  


St. Amour residents may be pleased with the pollution abatement - but the owner is not happy.
Note the stripped smoke plume skeletons left dangling from the flare pipe 
and draped across the refinery complex.


There has to be one dang comfy mouse nest around here someplace - that I'm sure I'll discover someday,
when I least expect it.  Thankfully I had plenty more vitamin-jar cotton wads in stock.


With a little encouragement, the cotton wads naturally contribute some great curling and roiling when stretched out, that seems to animate the smoke plumes even though they're standing still.  


Some spray adhesive both attaches the plume to a wire frame, and, 
puts a "set" on it so that it will hold its shape.    


 Add some gentle shots with the flat black - and a whole bunch of fiddling, fussing, and cussing -  
and the James River Basin Petroleum Corp. is back in production, filling all those JBAX tank cars.  


The varmints, for their part, have been forcibly removed.  


Thanks for reading, and let me know what you think!  What have critters done to your layout?  


Notes:

  1. For the adhesive, I find the 3M #77 works better for this purpose than the #45.  It's stronger, yes, but what goes with that is that it tends to dry more completely, and loses its "tack", which helps it resist cobwebs, etc., better.
  2. The wire is just some #22 hookup, stripped bare.  You're looking for strength enough to give the cotton some spine to suspend the plume, but not so much that you destroy the puffiness trying to adjust the overall shape. 
  3. The flare pipe is powered by an Evans Design LED flame module.  They have two styles - the smaller "Fire" version, which I used in the still over in Mineshaft Gap, and the "Flickering Fire" version, which alternately flashes two orange and one red LED.  I chose the latter for the more spirited inferno you expect from a flare pipe, and added another LED to it, too - a slow-flash yellow.  It's a pretty cool effect I have to say - the surging flame combined with the roiling smoke really does make it hard to believe nothing's moving.  But what it does best, though, is totally distract the eye from the fact that there's a giant mirror across the scene.  


Sunday, July 16, 2023

Passenger Fs!


Like many railroads, the SNR began dieselizing passenger service with EMD E-units - in our case, E6s in 1940.  


However, like several mountain railroads, the SNR found that the A-1-A trucks on passenger engines lowered the weight ratio on the powered axles, making them a bit slippery on stout grades.  The solution for the SNR - like the ATSF, GN, and NP, among others - was to switch to F-units.  An F had 2/3 the horsepower and weight of an E, and all of it resting on drivers via the B-B trucks.


Heating the train was a problem with this approach however, as there was no room in an F3 for a steam generator's water supply.  The debut of the longer-wheelbase FP7 in 1949 resolved this issue, especially for local and flatland single-unit service.  But before that time, the solution was to mount boilers in the F B-units, fitting the water tanks into the cavity where the cab would have gone.  On the long-distance premier trains that these railroads were equipping, multiple-unit consists were the rule, leaving numerous Bs available for steam service. 


Steam generator intake and exhaust castings came from Details West.


In the model world as well, despite having lusted after those beautiful shovel-nosed Es from age 5**, I ultimately had to confess that they were disappointing in the mountains.  In this case it wasn't the weight on drivers, but the fact that on my layout, the curves in the mountains are effectively at eye level, causing those big, long boats to look clunky rather than slick.  I have always sought out shorter versions of passenger cars to reduce exactly this effect, and I had to come to terms with the fact that the Es were as objectionable as the Pullmans.  


Shorter-wheelbase F3s glide handily through the curves at LeMont, W. Va..


But with the elaborate paint scheme on my E6s having cost so much blood, sweat, & tears, and made me so very happy (♩♩♩ 𝅗𝅥  ♬♫)*, I couldn't just ditch them.  Fortunately I was helped along by electrical gremlins... (hey when have you heard those words in the same sentence!).

Tech wizard Darren Williamson (IHB) had invested vast effort into my Proto E6s, converting them to DCC, and even adding sound into one powered B-unit.  That one though was such a baboon heart, with all the cutting and milling required, that we never were quite able to get it to run reliably.  Eventually a short developed that just would not go away - and for good measure, the companion A-unit soon laid down too.  And not just on curves and grades, but sometimes even on straight track.  I concluded this had to be the universe knocking on the enginehouse door and saying "Try Fs, woodja?".  I decided I'd give up on that pair of E6s at least, and stop making Darren's life miserable.  


Fs accelerate out of the passenger terminal and across Della St. in 1950.


In the same way that after your kids' cool old Saab 900 has been to the garage for the 400th time and you just want to buy them a Camry that will always start and will run forever - maybe with a fresh clutch - the solution to the E6s was the eternal Stewart F3.  I love these things, and depend on them for the entire cab-unit freight fleet.  I've run the same engines for almost 30 years.

So it was decided:  SNR's second order for passenger diesels would be A-B-B sets of boiler-equipped F3s, in 1946. These engines would debut on the point of the new all-coach Queen City, splashed in the tri-color scheme designed by EMD for the E6s years earlier - originally done in anticipation of future stainless steel passenger equipment.  

The challenge was going to be fitting that swooshy-zoot paint scheme, designed for a swooshy-zoot 70' shovel-nose, onto a stubby 50' carbody and making it match the fleet.  But after much stewing and experimentation, accommodating the intakes and portholes, I think I got pretty close to a family look.  The B-units help out with the trailing length.


Glistening new F3s show off their "Queen City scheme" paint, with the matching new Budd stainless trainset in 1946.


Out on the railway, however, the arrival of the passenger Fs for the name trains downgraded the E6s to secondary and mail train service.  And sadly for railfans, that move therefore bumped the last of the long-distance passenger steam off the roster.  Yes the iconic blue and orange locomotives that had ushered in the Tidewater scheme with the re-equipping of the namesake train in 1934 were soon stored, and by the layout year (1952) are now white-lined and being sold for scrap ***.


Heavy Pacific #1275, filthy but still proudly wearing its Tidewater colors to the end, 
is in tow on SM-8, billed for the scrap dealer.


In a rare color shot from 1935, almost everything is less than a year old - the Tidewater's modern lightweight consist and paint scheme, the gleaming Pacific's matching blue suit, and... Kodachrome. What better way to capture the new era - even if the color balance in those days was still evolving a bit.


In 1952 once again, the obsolete #1275 is shoved into a "cut track" at Alleghany Scrap in St. Amour.  


I have often envied my friends who model actual prototype railroads, and can deploy beautifully painted engines right from the box.  But as for freelance paint schemes, I still have to think that despite the blood, sweat, & tears... God bless the child that's got his own.  (♬𝅗𝅥  ♬♩)* 

Thanks for reading, and let me know what you think!


Footnotes

* (♩♩ 𝅗𝅥  ♬♫) Blood, Sweat & Tears - "You've Made Me So Very Happy"

* (♬𝅗𝅥  ♬♩) Blood, Sweat & Tears - "God Bless The Child"

** This would be from watching the beautiful blue and grey EAs on the O-scale B&O exhibition layout which the Cincinnati Gas & Electric Co. always displayed in its lobby at Christmastime.  The best day of the year was always the first day of Christmas vacation, when I could go downtown with Mom to see the trains at 4th & Main, meet Dad (who worked in the building) for lunch, and then watch more trains.  See the last entry on this page: Suffolk Northern Ry.: Heroes and Influences

*** Thanks to Darren Williamson also for the donation of the nice Mantua Pacific for the rolling-scrap fleet.  D's dad "Slim" was not a modeler, but a benefactor of the module group when we were teenagers.  This was an engine he bought to run at module shows just because he liked it, in its President-wannabee B&O blue with gold trim.  Because the engine had been languishing away in a box since Slim died in 1993, we decided it would be a good remembrance of him to resurrect the Pacific, even if it were in scrap trim and SNR paint.  At least it's still blue!  Just needed a coal bunker constructed in place of the cast load, and a little refurbishment, in order to proudly wear that first-ever SNR passenger scheme.  


Wednesday, June 14, 2023

Disaster Narrowly Averted...


...as Bob Weir would say.  😀


Have you ever wondered what's inside this "hump" in West St. Amour?


"What hump?" 

-- Igor (Charlie Callas), Young Frankenstein


...Uhh, that big bulge that is only somewhat disguised by a 90-degree flat for Kees-Austin Publishing Co., and a curved backdrop section? 

Don't be fooled by those pipes coming from the boiler, darting out under the rest of the house - they're merely passing through.  


What's actually inside the hump, is the air handler for the A/C system that cools and dehumidifies about ⅔ of the basement.


And what's inside the air-handler, is R-22 - a refrigerant from a prior century, so reviled for its ozone-depleting effectiveness that the manufacture of equipment using it was outlawed in... 2009.  Along with replacement parts - which is unlucky for grandfathered-in systems maintained far beyond their depreciable lifespans by cheapskate accountants, such as myself.  

SO.  As the eternally slow leak accelerated, along with the price of R-22 (now over $300/lb.), the day of reckoning I'd always feared had arrived.  Nothing to do but replace the condenser.  And new high-pressure condensers can't use the same air handlers as old lower-pressure systems.

$#!+

See, back in the benchwork and backdrop phases of construction, I carefully built removable sections in front of this hump, as any responsible adult would.

Of course by the roadbed, trackwork, wiring, and scenery phases, I'd tended to let my discipline lapse a trifle, as any weary layout builder ready to just get the ____ ON with it would.  

So while replacing this beast might not require chainsaws..., there would still be a horrific amount of destruction to West St. Amour - and likely, adjacent sections - which would surely knock the SNR offline for who knows how many months.  And yeah, probably chainsaws anyway.  

It's funny how we just let existential threats seep slowly in through the walls, casually draping Harry Potter's Invisibility Cloak over them and moving on, undeterred.


Well, don't fear the reaper, friend - just whack that cowbell to celebrate the arrival of the modern A/C miracle:  the mini-split!  


This game-winning solution was proposed by our regular A/C tech, having grown weary of my endless campaigning to avoid condemning the system.  "We" (they) simply hung the head unit from a 1½-ton mini-split on the laundry room wall, swapped out the condenser, and abandoned the old air handler in place behind St. Amour.  Et voila - cool, dry air - no destruction.

Well... not counting the 4" hole they had to bore through 14" of plaster, wood, concrete, and granite.


Not sure why it took us so many years to get here.  There's another mini-split cooling the family room, just next door.  Been there for years.  I was just stuck inside the box, thinking we had to replace one system with another of the same configuration.  And so, I steadfastly refused any talk of a replacement, until finally the A/C did nothing but make noise.  

So it was a good day.  Even with having made some significant preparations to avoid the complete devastation of the layout, the disruption this was going to cause was a ticking time bomb I had been dreading for years, now to the point of nausea.  What a relief.

👉  St. Amour is saved!  👈


How about you?  What infrastructural peril does your layout face?  Or what diligent preparations have you made to avoid catastrophe?   Let me know what you think!  Thanks for reading.


Thursday, April 27, 2023

Stenciling Wrapped Shipments


When we build something, we want to show it off.  "Take pride in your work," as the old saying goes.  (Or the 21st century version:  "Leave no square inch un-marketed upon.")

My friend Ed Swain (PRR Middle Division), aka "The Loadmaster" **, recently sent along a shot of an unspecified load in a gondola, wrapped in a tarp, and stenciled "ALCO", that was really compelling. 

This is cool enough in its own right - the gon, the stenciling, the mystery load that looks like it might be a prime mover?  Or maybe a section of road switcher hood...?  But it got me thinking - wouldn't it be neat to adapt the idea to some on-line customers?  And for that matter, what a great way to reference industries on other layouts, or those named for friends but not modeled, as I do with billboards.


Field Fabricating in St. Amour, W. Va. is named for my late friend of 43 years, Brian Field (Kentucky & NorthEastern) ***.  His 1967 Olds 442 convertible was so thoroughly rusted when he bought it that it contained virtually no intact factory sheetmetal - so restoring it necessitated fabricating a complete Frankenstein, from salvage parts, tin, pop rivets, and Bondo.  Hence, the name of the company - which was Darren Williamson's (IHB) tribute to his effort and/or mania. 


The Della St. yard crew pulls the mystery shipment 
from the loading shed at Field Fabricating.


Since a steel fabricator can ship a vast variety of things ****, the Field Co. seemed a great candidate to try this out on.  But for starters, what exactly is it they'd be shipping?  Well... who cares?  It's wrapped! 😀  All we need to know is, it's going to be big enough to require a gondola and not a truck, but not a depressed-center flat.  And, it probably has sensitive components and/or is not painted yet, requiring protection from the weather.  I say good enough!

So with basically endless possibilities for the shape, the goal was simply to create something plausible, in that size range.  I mainly wanted it to have some dimensional irregularity, so it would create interest in the angles and draping of the tarp - but not be too delicate.  I ended up using a long wood block for its main...  umm...  thing, with a longer and narrower, err... chassis underneath, and a uhh...  clerestory of sorts on top.  I'm imagining a large electrical control center, but honestly it could be anything that could be built off-site and integrated into a larger project. (Or vessel - an inland fabricator could easily be sourcing specialty boat chunks for the Portsmouth shipyards.)


The tarp material had to be thin enough to drape properly, but still hardy enough to not end up torn or deformed by handling.  Candidates included Saran Wrap which was too thin and unstable, and a hunk of old shower curtain, which was too thick.  I ended up using the package from an Eddie Bauer shirt, which seemed a good middle ground - and it holds paint too.  I used 3M spray adhesive to anchor the tarp on the bottom, but nothing on the top or sides, so that it could stretch and drape naturally.

The paint is Model Master Blue Angel Blue, which made the best "tarp-y" color of what I had on hand.  It's even pretty close to Alco's, but honestly, in that era it could be almost anything.  We just need a dark enough shade to stencil. 


The lettering is left over from an early decal attempt for the Field building itself - smaller and more condensed than the final version that's up on the cornice.  Ideally I suppose the load should say "Fabricating" on it too, or "The F.B. Field Co. Inc." which is the actual corporate entity, but I didn't feel like messing around with another set of decals.  In fact, "FIELD" may be enough of a household word in the region that it can stand alone, like "FORD".  I'm not sure - I'd have to ask a St. Amour resident.  I'll do it up right for the next one!

This was a simple and fun experiment, but I think it opens up a world of possibilities.  Thanks for reading, and let me know what you think in the comments below!


Footnotes:

**    There's a billboard in rotation on the SNR that's a tribute to Ed Swain and all the meticulously detailed and prototypically secured open-car loads on his layout.  Thanks for the inspiration, Ed!


***   Since we've just put his name on a tarp, it seemed a good time for a visual on Brian, in the context of several other folks you either know or have heard me talk about.  (Or, you may have seen industries named for them on the SNR.)  How about this shot of the original crew in 1992:


Left to right:  Darren Williamson ("Large"), yours truly ("Needle-Neck"), Brian Field ("Small"), Roger Rassche ("Phat"), Rick Colloton ("Schwab"), and Dan Hadley ("Dan").  Roger and Brian have left the building already, too soon.  


****    If you're interested, here's another post on open-car loads for Field Fabricating, and a little background on the company and its facility too:  Suffolk Northern Ry.: Two New Loads for Field Fabricating